How to use model class in android
For developing mobile applications architecture choice is very important Because only architecture decides the quality of implementation and development time of mobile apps. Effective Mobile App Development Services ensure that the right architecture is chosen for smooth functionality.
IOS development is based on MVC(Model View Controller) so it is well structured but in Android, there is no such architecture. So the android quality of the product and choice of architecture depend on the developer. I’ll show you an effective way to use MVC in Android application development.
Follow these steps for implementing MVC in an Android application:
1: Create a new project (eg. MVCInAndroid)

2: Select Target SDK Version

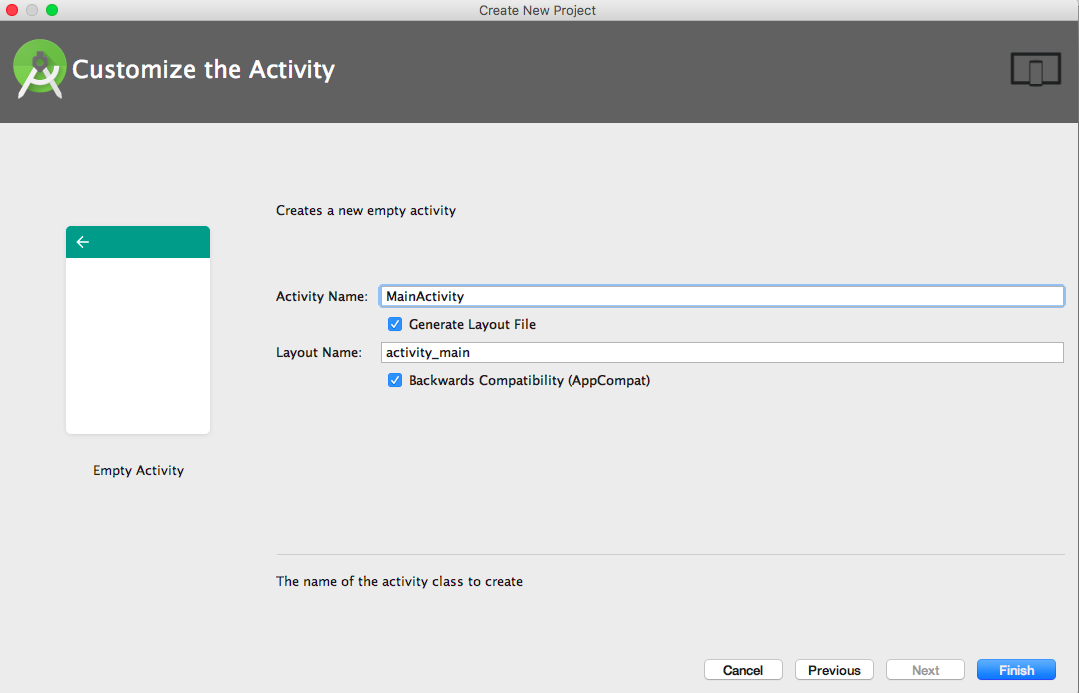
3: Now select Empty Activity
![]()
4: now click on Finish button and project is setup
5: Project Structure

6: Create a model class
Now we create a package under main package i.e. com.android.modelinandroid named model and under model package create a model class named “Item”. We create this model class for storing item data like name or any other details.
Your model would usually be a set of classes that hold your data and business logic. In this example case, probably an Item class having a name, name of painter and thumbnail properties.
In model class, there are mainly three methods —
-
Constructor: It is a bridge between model and adapter class.
-
Getter method: This method is used for getting values of any property.
-
Setter method: This method is used for setting value of any property
So when the user asks for information through View, view goes to the controller and the controller notifies the model. The model gives that information to the controller and the controller notifies View about that information so the user can see that information.
File : src/model/Item.java
package com.android.modelinandroid.Model;public class Item { private String name; private String nameofpainter; private int thumbnail; public Item(String name, String nameofpainter, int thumbnail) { this.name = name; this.nameofpainter = nameofpainter; this.thumbnail = thumbnail; } public String getName() { return name; } public void setName(String name) { this.name = name; } public String getNameofpainter() { return nameofpainter; } public void setNameofpainter(String nameofpainter) { this.nameofpainter = nameofpainter; } public int getThumbnail() { return thumbnail; } public void setThumbnail(int thumbnail) { this.thumbnail = thumbnail; }}7:CreateAdapter Class
Now we create an adapter class for getting data from the model and show it on view for the user. An adapter acts as an overpass between an AdapterView and the underlying data for that view. The adapter provides access to the data items and is answerable for creating a view for each item in the data set. Adapters are a good way to connect a View with some kind of data source.
In this example, we use a recycler view adapter. Recycler view is a flexible view for providing a limited window into a large data set.
Steps for creating an adapter class
7.1 → first declare variables. There are mainly two variables “Context” and “ArrayList”.
Context is used for access to application-specific resources and classes, as well as calls for application-level operations such as launching activities, broadcasting and receiving intents, etc.
ArrayList provides a resizable array, which means that items can be added and removed from the list. It implements the List interface.
7.2 → Now we create Override methods
-
MyViewHolder() —> In this method we define view and get text view or image view from XML by their ID.
-
Create aparameterized constructor—> Constructor is the mediator between Adapter and Activity.
-
onCreateViewHolder() —> This method creates the view for the user.
-
onBindViewHolder() —> This method binds data with a list of items.
-
getItemCount() —> This method indicates how many items (or rows) are in the data set that will be presented in the AdapterView.
File : src/adapter/ItemAdapter.java
package com.android.modelinandroid.Adapter;import android.content.Context;import android.support.v7.widget.PopupMenu;import android.support.v7.widget.RecyclerView;import android.view.LayoutInflater;import android.view.MenuInflater;import android.view.MenuItem;import android.view.View;import android.view.ViewGroup;import android.widget.ImageView;import android.widget.TextView;import android.widget.Toast;import com.android.modelinandroid.Model.Item;import com.android.modelinandroid.R;import com.bumptech.glide.Glide;import java.util.List;public class ItemAdapter extends RecyclerView.Adapter { private Context mContext; private List itemList; public class MyViewHolder extends RecyclerView.ViewHolder { public TextView title, count; public ImageView thumbnail, overflow; public MyViewHolder(View view) { super(view); title = (TextView) view.findViewById(R.id.title); count = (TextView) view.findViewById(R.id.count); thumbnail = (ImageView) view.findViewById(R.id.thumbnail); overflow = (ImageView) view.findViewById(R.id.overflow); } } public ItemAdapter(Context mContext, List itemList) { this.mContext = mContext; this.itemList = itemList; } @Override public MyViewHolder onCreateViewHolder(ViewGroup parent, int viewType) { View itemView = LayoutInflater.from(parent.getContext()) .inflate(R.layout.row_list_item, parent, false); return new MyViewHolder(itemView); } @Override public void onBindViewHolder(final MyViewHolder holder, int position) { Item item = itemList.get(position); holder.title.setText(item.getName()); holder.count.setText("painted by -" + item.getNameofpainter()); // loading album cover using Glide library Glide.with(mContext).load(item.getThumbnail()).into(holder.thumbnail); holder.overflow.setOnClickListener(new View.OnClickListener() { @Override public void onClick(View view) { showPopupMenu(holder.overflow); } }); } /** * Showing popup menu when tapping on 3 dots */ private void showPopupMenu(View view) { // inflate menu PopupMenu popup = new PopupMenu(mContext, view); MenuInflater inflater = popup.getMenuInflater(); inflater.inflate(R.menu.menu_item, popup.getMenu()); popup.setOnMenuItemClickListener(new MyMenuItemClickListener()); popup.show(); } /** * Click listener for popup menu items */ class MyMenuItemClickListener implements PopupMenu.OnMenuItemClickListener { public MyMenuItemClickListener() { } @Override public boolean onMenuItemClick(MenuItem menuItem) { switch (menuItem.getItemId()) { case R.id.action_like: Toast.makeText(mContext, "Like", Toast.LENGTH_SHORT).show(); return true; case R.id.action_unlike: Toast.makeText(mContext, "Unlike", Toast.LENGTH_SHORT).show(); return true; default: } return false; } } @Override public int getItemCount() { return itemList.size(); }}8:Create MainActivity
In this activity, we show data in the recycler List View.
First, we create an object of the Item model
Item item = new Item(String title, String name, ArraylistImages[0]);
Now we add item list data to the Item model. So data is saved in the model class.
itemList.add(item);
Full Main Activity Code →
File : src/Activity/MainActivity.java
package com.android.modelinandroid.Activity;import android.content.res.Resources;import android.graphics.Rect;import android.support.design.widget.AppBarLayout;import android.support.design.widget.CollapsingToolbarLayout;import android.support.v7.app.AppCompatActivity;import android.os.Bundle;import android.support.v7.widget.DefaultItemAnimator;import android.support.v7.widget.GridLayoutManager;import android.support.v7.widget.RecyclerView;import android.support.v7.widget.Toolbar;import android.util.TypedValue;import android.view.View;import android.widget.ImageView;import com.android.modelinandroid.Adapter.ItemAdapter;import com.android.modelinandroid.Model.Item;import com.android.modelinandroid.R;import com.bumptech.glide.Glide;import java.util.ArrayList;import java.util.List;public class MainActivity extends AppCompatActivity { private RecyclerView recyclerView; private ItemAdapter itemAdapter; private List itemList; @Override protected void onCreate(Bundle savedInstanceState) {   super.onCreate(savedInstanceState);   setContentView(R.layout.activity_main);   Toolbar toolbar = (Toolbar) findViewById(R.id.toolbar);   setSupportActionBar(toolbar);   initCollapsingToolbar();   recyclerView = (RecyclerView) findViewById(R.id.recycler_view);   itemList = new ArrayList<>();   itemAdapter = new ItemAdapter(this, itemList);   RecyclerView.LayoutManager mLayoutManager = new GridLayoutManager(this, 2);   recyclerView.setLayoutManager(mLayoutManager);   recyclerView.addItemDecoration(new GridSpacingItemDecoration(2, dpToPx(10), true));   recyclerView.setItemAnimator(new DefaultItemAnimator());   recyclerView.setAdapter(itemAdapter);   preparePaintings();   try {     Glide.with(this).load(R.drawable.cover).into((ImageView) findViewById(R.id.backdrop));   } catch (Exception e) {     e.printStackTrace();   } } /**  * Initializing collapsing toolbar  * Will show and hide the toolbar title on scroll  */ private void initCollapsingToolbar() {   final CollapsingToolbarLayout collapsingToolbar =       (CollapsingToolbarLayout) findViewById(R.id.collapsing_toolbar);   collapsingToolbar.setTitle(" ");   AppBarLayout appBarLayout = (AppBarLayout) findViewById(R.id.appbar);   appBarLayout.setExpanded(true);   // hiding & showing the title when toolbar expanded & collapsed   appBarLayout.addOnOffsetChangedListener(new AppBarLayout.OnOffsetChangedListener() {     boolean isShow = false;     int scrollRange = -1;     @Override     public void onOffsetChanged(AppBarLayout appBarLayout, int verticalOffset) {       if (scrollRange == -1) {         scrollRange = appBarLayout.getTotalScrollRange();       }       if (scrollRange + verticalOffset == 0) {         collapsingToolbar.setTitle(getString(R.string.app_name));         isShow = true;
   } else if (isShow) {         collapsingToolbar.setTitle(" ");         isShow = false;       }     }   }); } /**  * Adding few albums for testing  */ private void preparePaintings() {   int[] paintings = new int[]{       R.drawable.painting1,       R.drawable.painting2,       R.drawable.painting3,       R.drawable.painting4,       R.drawable.painting5,       R.drawable.painting6,       R.drawable.painting7,       R.drawable.painting8,       R.drawable.painting9,       R.drawable.painting10,};   Item item = new Item("Monalisa", "Leonardo da Vinci", paintings[0]);   itemList.add(item);   item = new Item("School of Athens", "Raphael", paintings[1]);   itemList.add(item);   item = new Item("Night Watch", "Rembrandt", paintings[2]);   itemList.add(item);   item = new Item("Beheading of Saint John the Baptist", "Caravaggio", paintings[3]);   itemList.add(item);   item = new Item("Guernica", "Picasso", paintings[4]);   itemList.add(item);   item = new Item("The Last Supper", "Leonardo da Vinci", paintings[5]);   itemList.add(item);   item = new Item("The Creation of Adam", "Michelangelo", paintings[6]);   itemList.add(item);   item = new Item("Landscape with the Fall of Icarus", "Pieter Bruegel", paintings[7]);   itemList.add(item);   item = new Item("Starry Night", "Vincent Van Gogh", paintings[8]);   itemList.add(item);   item = new Item("Water Lilies", "Claude Monet", paintings[9]);   itemList.add(item);   itemAdapter.notifyDataSetChanged(); } /**  * RecyclerView item decoration - give equal margin around grid item  */ public class GridSpacingItemDecoration extends RecyclerView.ItemDecoration {   private int spanCount;   private int spacing;   private boolean includeEdge;   public GridSpacingItemDecoration(int spanCount, int spacing, boolean includeEdge) {     this.spanCount = spanCount;     this.spacing = spacing;     this.includeEdge = includeEdge;   }   @Override   public void getItemOffsets(Rect outRect, View view, RecyclerView parent, RecyclerView.State state) {     int position = parent.getChildAdapterPosition(view); // item position     int column = position % spanCount; // item column     if (includeEdge) {       outRect.left = spacing - column * spacing / spanCount; // spacing - column * ((1f / spanCount) * spacing)       outRect.right = (column + 1) * spacing / spanCount; // (column + 1) * ((1f / spanCount) * spacing)       if (position < spanCount) { // top edge         outRect.top = spacing;       }       outRect.bottom = spacing; // item bottom     } else {       outRect.left = column * spacing / spanCount; // column * ((1f / spanCount) * spacing)       outRect.right = spacing - (column + 1) * spacing / spanCount; // spacing - (column + 1) * ((1f /  spanCount) * spacing)       if (position >= spanCount) {         outRect.top = spacing; // item top       }     }   } } /**  * Converting dp to pixel  */ private int dpToPx(int dp) {   Resources r = getResources();   return Math.round(TypedValue.applyDimension(TypedValue.COMPLEX_UNIT_DIP, dp, r.getDisplayMetrics())); }}
Almost Done !
9:Now the UI part
9.1 –> Create activity_main.xml file
File: res/layout/activity_main.xml
<?xml version="1.0" encoding="utf-8"?><android.support.design.widget.CoordinatorLayout xmlns:android="http://schemas.android.com/apk/res/android" xmlns:app="http://schemas.android.com/apk/res-auto" android:id="@+id/main_content" android:layout_width="match_parent" android:layout_height="match_parent" android:background="@android:color/white" android:fitsSystemWindows="true"> <android.support.design.widget.AppBarLayout android:id="@+id/appbar" android:layout_width="match_parent" android:layout_height="@dimen/detail_backdrop_height" android:fitsSystemWindows="true" android:theme="@style/ThemeOverlay.AppCompat.Dark.ActionBar"> <android.support.design.widget.CollapsingToolbarLayout android:id="@+id/collapsing_toolbar" android:layout_width="match_parent" android:layout_height="match_parent" android:fitsSystemWindows="true" app:contentScrim="?attr/colorPrimary" app:expandedTitleMarginEnd="64dp" app:expandedTitleMarginStart="48dp" app:expandedTitleTextAppearance="@android:color/transparent" app:layout_scrollFlags="scroll|exitUntilCollapsed"> <RelativeLayout android:layout_width="wrap_content" android:layout_height="wrap_content"> <ImageView android:id="@+id/backdrop" android:layout_width="match_parent" android:layout_height="match_parent" android:fitsSystemWindows="true" android:scaleType="centerCrop" app:layout_collapseMode="parallax" /> <LinearLayout android:layout_width="wrap_content" android:layout_height="wrap_content" android:layout_centerInParent="true" android:gravity="center_horizontal" android:orientation="vertical"> <TextView android:id="@+id/love_music" android:layout_width="wrap_content" android:layout_height="wrap_content" android:text="@string/backdrop_title" android:textColor="@android:color/white" android:textSize="@dimen/backdrop_title" /> <TextView android:layout_width="wrap_content" android:layout_height="wrap_content" android:text="@string/backdrop_subtitle" android:textColor="@android:color/white" android:textSize="@dimen/backdrop_subtitle" /> </LinearLayout> </RelativeLayout> <android.support.v7.widget.Toolbar android:id="@+id/toolbar" android:layout_width="match_parent" android:layout_height="?attr/actionBarSize" app:layout_collapseMode="pin" app:popupTheme="@style/ThemeOverlay.AppCompat.Light" /> </android.support.design.widget.CollapsingToolbarLayout> </android.support.design.widget.AppBarLayout> <include layout="@layout/content_main" /></android.support.design.widget.CoordinatorLayout>
9.2 –> Create content_main.xml file
File: res/layout/content_main.xml
<?xml version="1.0" encoding="utf-8"?><RelativeLayout xmlns:android="http://schemas.android.com/apk/res/android"  xmlns:app="http://schemas.android.com/apk/res-auto"  xmlns:tools="http://schemas.android.com/tools"  android:layout_width="match_parent"  android:layout_height="match_parent"  android:background="@c

olor/viewBg"  app:layout_behavior="@string/appbar_scrolling_view_behavior"  tools:context=".Activity.MainActivity"  tools:showIn="@layout/activity_main">  <android.support.v7.widget.RecyclerView    android:id="@+id/recycler_view"    android:layout_width="match_parent"    android:layout_height="wrap_content"    android:clipToPadding="false"    android:scrollbars="vertical" /></RelativeLayout>
9.3 –> Create row_list_item.xml file
File: res/layout/row_list_item.xml
<LinearLayout xmlns:android="http://schemas.android.com/apk/res/android" xmlns:card_view="http://schemas.android.com/apk/res-auto" android:layout_width="match_parent" android:layout_height="wrap_content"> <android.support.v7.widget.CardView android:id="@+id/card_view" android:layout_width="match_parent" android:layout_height="match_parent" android:layout_gravity="center" android:layout_margin="@dimen/card_margin" android:elevation="3dp" card_view:cardCornerRadius="@dimen/card_album_radius"> <RelativeLayout android:layout_width="match_parent" android:layout_height="match_parent"> <ImageView android:id="@+id/thumbnail" android:layout_width="match_parent" android:layout_height="@dimen/album_cover_height" android:background="?attr/selectableItemBackgroundBorderless" android:clickable="true" android:scaleType="fitXY" /> <TextView android:id="@+id/title" android:layout_width="match_parent" android:layout_height="wrap_content" android:layout_below="@id/thumbnail" android:paddingLeft="@dimen/album_title_padding" android:paddingRight="@dimen/album_title_padding" android:paddingTop="@dimen/album_title_padding" android:textColor="@color/album_title" android:textSize="@dimen/album_title" /> <TextView android:id="@+id/count" android:layout_width="match_parent" android:layout_height="wrap_content" android:layout_below="@id/title" android:paddingBottom="@dimen/songs_count_padding_bottom" android:paddingLeft="@dimen/album_title_padding" android:paddingRight="@dimen/album_title_padding" android:textSize="@dimen/songs_count" /> <ImageView android:id="@+id/overflow" android:layout_width="@dimen/ic_album_overflow_width" android:layout_height="@dimen/ic_album_overflow_height" android:layout_alignParentRight="true" android:layout_below="@id/thumbnail" android:layout_marginTop="@dimen/ic_album_overflow_margin_top" android:scaleType="centerCrop" android:src="@drawable/ic_dots" /> </RelativeLayout> </android.support.v7.widget.CardView></LinearLayout>
Almost Done!
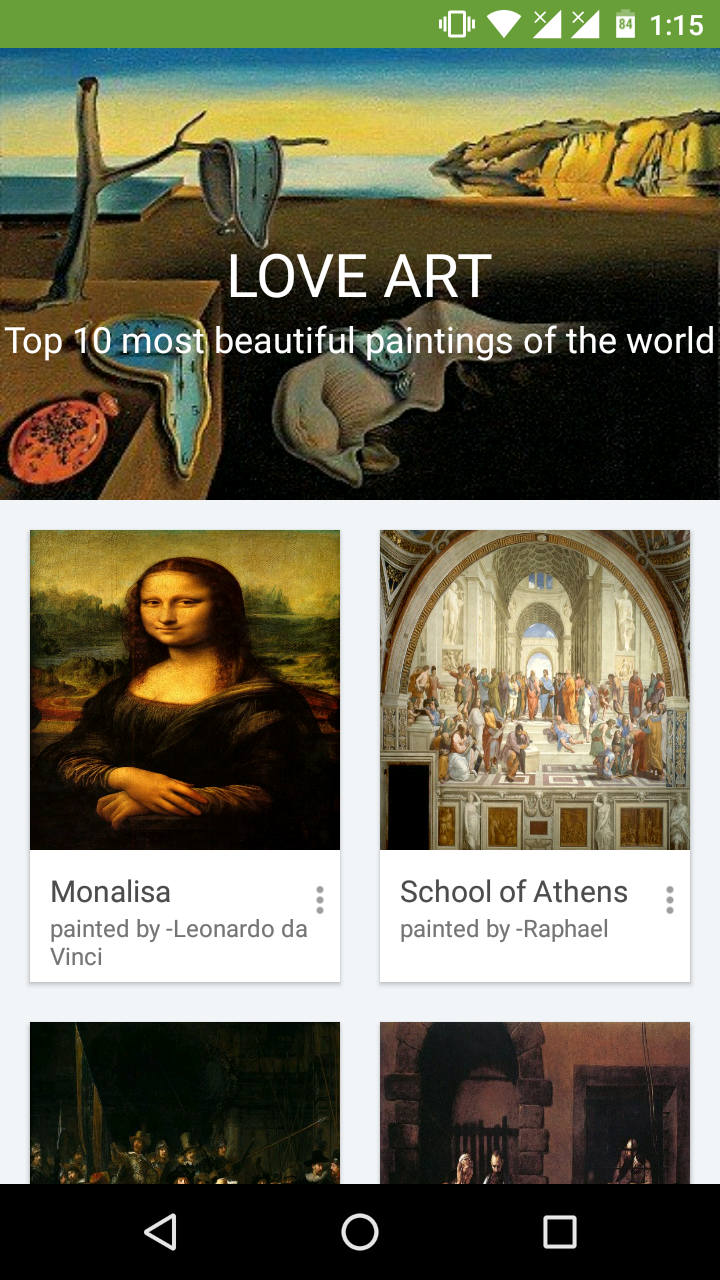
10:Now run the app through the emulator or use your Android device and see the data of list

Download the demo Example –>Download Demo Project
Enjoy the code 🙂

